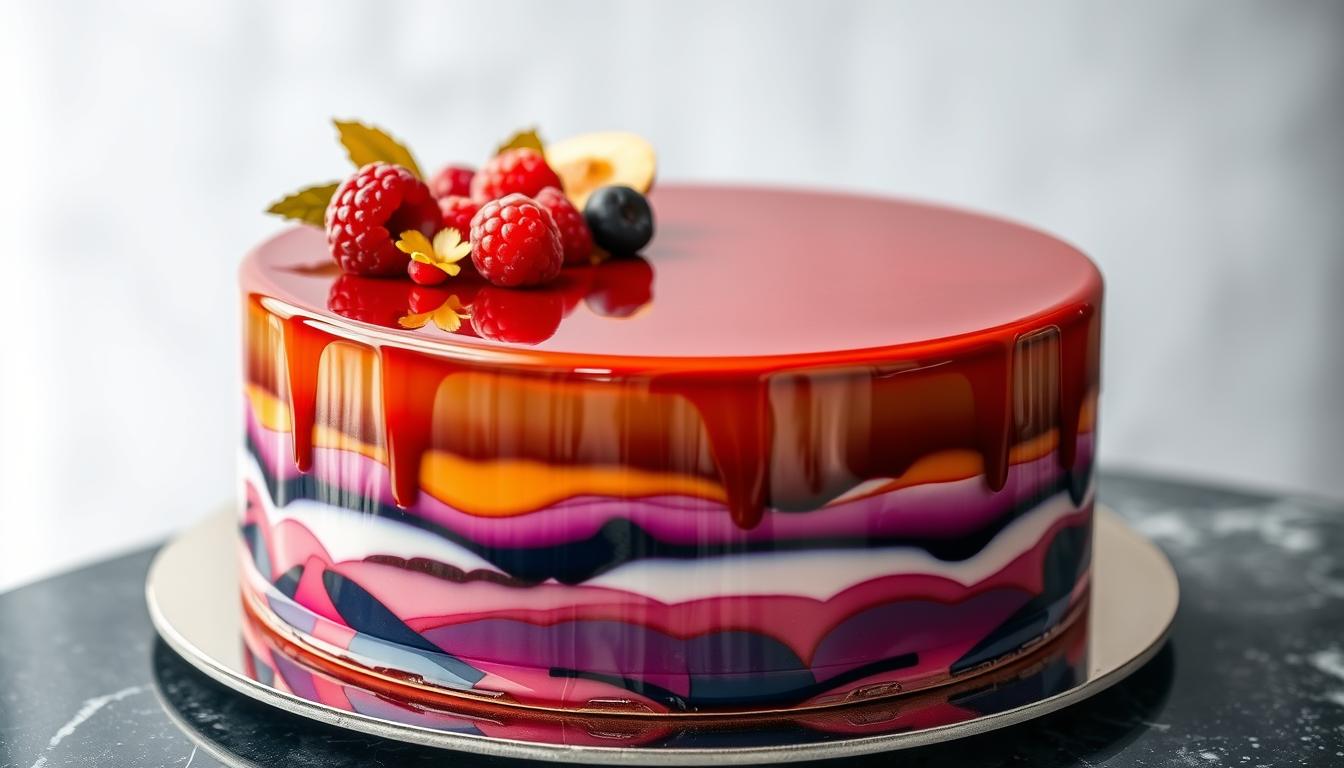
As I gently glided my fork through the glossy surface, the reflection of the light danced across the perfectly smooth cake. The mirror glaze had transformed a simple entremet into a work of edible art, captivating all who laid eyes on it. In that moment, I knew I had to master this technique and share the joy of creating such a stunning dessert.
Mirror glaze cakes, often referred to as “shiny cakes,” have become a beloved trend in the pastry world. They captivate both professional chefs and home bakers alike. This remarkable technique involves pouring a chocolate and sugar-based glaze over a frozen cake. It results in a mesmerizing, reflective finish that’s both visually striking and delicious.
Whether you’re an experienced baker or new to the world of mirror glaze, this recipe will guide you step-by-step. You’ll learn to create your own showstopping mirror glaze cake. With a few key techniques and the right ingredients, you’ll be able to transform your cakes into edible works of art. These will leave your guests in awe.
Table of Contents
Key Takeaways
- Mirror glaze cakes are known for their stunning, glossy finish that reflects light beautifully.
- The key to a successful mirror glaze is the right balance of gelatin bloom, temperature, and ingredient proportions.
- Mastering the mirror glaze technique allows you to create impressive, professional-looking cakes at home.
- Proper chilling of the cake and temperature control of the glaze are crucial for achieving a flawless mirror finish.
- Experimenting with different color techniques and design variations can make your mirror glaze cakes truly unique.
Understanding Mirror Glaze Cake Origins and Techniques
The mirror glaze technique comes from French patisserie traditions. French pastry chefs used it for decades to seal and preserve flavors. But it wasn’t until 2016 that it became popular on social media, thanks to Russian pastry chef Olga Noskova.
History of French Patisserie Glazing
French pastry chefs used mirror glazes for 30 to 40 years before it became trendy. They used it to seal and protect their mirror glaze technique, glazed patisserie, and French pastry designs. The glossy finish made the desserts look better and kept them fresh.
How Mirror Glaze Creates Its Signature Shine
The mirror glaze’s shine comes from sweetened condensed milk, chocolate, water, and gelatin. Gelatin is key for its soft, shiny finish. The right temperature is also important for the perfect consistency and shine.
Professional Pastry Techniques at Home
Home bakers can now make professional mirror glaze technique desserts. With the right ingredients and temperature control, anyone can create stunning mirror glaze cakes at home.
| Ingredient | Purpose |
|---|---|
| Gelatin | Gives the glaze its soft, shiny finish |
| Sweetened Condensed Milk | Contributes to the glaze’s signature shine |
| Chocolate | Adds depth and richness to the glaze |
| Water | Helps achieve the desired consistency |
“Experimentation is key when it comes to using mirror glazes. The more you play with the recipe and techniques, the better you’ll become at creating your own unique and stunning mirror glaze cakes.” – Olga Noskova, Russian Pastry Chef
Essential Ingredients for a Flawless Mirror Glaze
To make a mirror glaze that shines on your cakes, you need the right mix of ingredients. You’ll need water, sugar, glucose syrup or corn syrup, sweetened condensed milk, gelatin, and white chocolate. You can also add food coloring to get the color you want.
The quality of your white chocolate is key for the taste and shine of your glaze. Choose couverture chocolates from brands like Valrhona and Cacao Barry for the best results. The gelatin’s strength, or bloom, should be between 225-230 for the right texture.
| Ingredient | Quantity |
|---|---|
| Water | 60g |
| Granulated Sugar | 150g |
| Liquid Glucose | 150g |
| Sweetened Condensed Milk | 100g |
| Unflavored Gelatin | 10g |
| White Chocolate | 150g |
| Food Coloring (optional) | A few drops |
This recipe makes about 500ml of glaze, enough for a big cake that’s 23cm in diameter. Remember, using high-quality ingredients and following the exact measurements is important for a perfect white chocolate mirror glaze finish.

Required Tools and Equipment Setup
Creating mirror glaze cakes needs the right tools and equipment. You’ll need tools for precise temperature control, mixing, and pouring. The right setup is key to getting that glossy finish.
Temperature Control Tools
Getting the temperature right is crucial for mirror glaze. You’ll need a digital thermometer to check the glaze’s temperature. This ensures the perfect consistency and shine.
Workspace Organization
Before starting, make sure your workspace is organized. Have all your mirror glaze tools and cake glazing equipment ready. This includes an offset spatula, wire rack, baking sheets, and plastic wrap. A tidy workspace helps you work more efficiently.
Mixing and Pouring Equipment
For smooth glaze application, you’ll need the right tools. An immersion blender is great for mixing the glaze and removing air bubbles. Also, a rubber spatula and large mixing bowls help keep the glaze smooth.
Choosing the right mirror glaze tools and cake glazing equipment is essential. With the right tools, you can master the mirror glaze finish.
Base Cake Preparation and Chilling Methods
A perfect mirror glaze starts with a well-prepared base cake. It’s key to chill the mirror cake base completely before glazing. This ensures the glaze spreads evenly and smoothly.
Start by shaping your cake in a silicone mold or cake ring. This keeps the frozen entremet in shape. Freeze the cake for a few hours or overnight. A fully frozen cake is essential for glazing.
Once frozen, remove the cake from the mold carefully. The frozen cake is easier to handle. Now, you can apply the mirror glaze and create a beautiful, glossy dessert.
| Statistic | Value |
|---|---|
| Prep Time | 10 minutes |
| Cook Time | 15 minutes |
| Cooling Time | 15 minutes |
| Servings | 4 |
| Calories | 350 kcal |
| Carbohydrates | 54g |
| Protein | 45g |
| Fat | 55g |
| Cholesterol | 110mg |
| Sugar | 58g |
| Iron | 1mg |
| Calcium | 64mg |
Neutral glaze makes baked goods look sleek and professional. It’s great for glazed cupcakes, cakes, fruit pies, petit fours, and fritters or donuts.
Mirror glaze, on the other hand, adds drama to baked goods. It’s perfect for cakes, mousse, individual cakes, dome-shaped desserts, and special treats.
Neutral glaze gives baked goods a shiny, professional look. Mirror glaze, however, makes them almost too beautiful to eat with its shiny finish.

Step-by-Step Mirror Glaze Recipe
Making a mirror glaze cake needs careful attention and the right temperature. Let’s go through the steps to get that shiny finish.
Gelatin Blooming Process
Start by blooming the gelatin in ice-cold water. Soak the gelatin in 2 tablespoons of cold water for about 5 minutes. This lets it absorb the liquid and soften.
Chocolate and Sugar Mixture
In a saucepan, mix 1 cup of granulated sugar, 1 cup of white chocolate chips, 1 cup of water, and 1/2 cup of corn syrup or glucose. Heat it to 217°F (103°C), stirring constantly. This ensures the sugar and chocolate melt well.
Temperature Control Guidelines
Getting the mirror glaze right depends on precise temperature control. After the sugar-chocolate mix reaches the right temperature, remove it from heat. Stir in the bloomed gelatin and 1 cup of sweetened condensed milk. Blend until it’s silky and smooth.
Let the glaze cool to 86-95°F (30-35°C) before pouring it over your cake. Keeping this temperature is key for the perfect consistency and shine.

“Precise temperature control is the secret to a flawless mirror glaze. Never compromise on this crucial step.”
Remember, this recipe is for a four-layer 6-inch cake. Adjust the ingredients if your cake is smaller or larger for the best results.
Color Techniques and Design Variations
Make your cake stand out with colored mirror glaze and mirror glaze designs. You can go for a bold look or something more subtle. These methods will make your cakes look amazing.
Begin by mixing gel food coloring into your glaze. Try different colors to get the perfect shade. For a marbled look, mix different glazes and swirl them before applying to your cake.
- Make ombre effects by layering colors, starting light and ending dark.
- Add a touch of luxury with edible gold or silver food coloring.
- Use stencils or pour glazes to create unique patterns.
For great mirror glaze designs, control the temperature and apply smoothly. Take your time and try new things. With colored mirror glaze, the sky’s the limit for your cake’s look.
“Mastering the art of mirror glaze is like unlocking a new dimension of visual delight for your cakes. With endless color and design possibilities, the only limit is your imagination.”
– Ksenia Penkina, Founder of PastryClass
Troubleshooting Common Mirror Glaze Issues
Getting the perfect mirror glaze is a delicate task. But with the right troubleshooting, you can overcome any problem. We’ll cover solutions for temperature issues and consistency problems. This will make sure your mirror glaze turns out great.
Temperature-Related Problems
Temperature is a big issue with mirror glaze. If it’s too thin, it’s probably because it was too hot. If it’s too thick, it was too cold. To fix this, heat or cool the glaze until it’s just right, around 92°F.
Consistency Corrections
Getting the right consistency is crucial for a glossy finish. If it’s too thin, heat it up while stirring. If it’s too thick, cool it down a bit or add warm water and stir.
Surface Imperfections Solutions
Air bubbles can ruin the smooth look of your glaze. Use an immersion blender to mix the glaze and get rid of bubbles. Or, tap the cake gently to help bubbles come up.
If the glaze doesn’t set right, check the gelatin. Make sure it’s strong enough for a firm finish. Also, freeze and level the cake before glazing for an even surface.
Remember, fixing mirror glaze issues is about understanding the science and making small tweaks. With patience and attention to detail, you’ll master mirror glaze in no time.
Advanced Decorating Techniques and Effects
Take your cake-decorating skills to the next level with advanced techniques. Try galaxy effects by mixing colors and adding edible glitter. This creates a stunning, otherworldly look.
Use geometric patterns by applying tape or stencils before pouring the glaze. This adds striking visual interest to your cake.
Texture is key in decorating. Add chocolate decorations or edible flowers to your mirror glaze cakes. This gives them a natural, organic feel.
Master airbrushing techniques for captivating gradient effects. This elevates your designs to new heights.
For a dramatic finish, try mirror glaze drips on tiered cakes. The glaze cascades, creating a stunning effect that will wow your guests.
Don’t be afraid to combine mirror glaze with other decorating techniques. This can include buttercream piping or intricate chocolate work. It lets you explore your creativity fully.
With practice and experimentation, the possibilities for advanced mirror glaze decorations are endless. Let your cakes shine like never before.
Storage and Serving Guidelines
Creating a perfect mirror glaze cake is just the start. Storing and serving it right is key to keep it looking and tasting great. Here’s how to enjoy your mirror glaze cake at its best.
Store mirror glaze cakes in the fridge for up to 4 days. Wrap any cut surfaces with plastic wrap to keep the glaze shiny. Freezing can ruin the cake’s texture and glaze.
Let your cake sit at room temperature for 15-20 minutes before serving. This lets the flavors and texture shine. Enjoy it the same day for the best glaze effect.
Follow these tips to show off your mirror glaze cake. It will impress everyone with its look and taste. Keeping your cake perfect is the last step to a memorable experience.
Conclusion: Mastering Your Mirror Glaze Journey
Creating perfect mirror glaze cakes takes patience and a keen eye for detail. As you work on these desserts, focus on keeping the temperature just right. Also, use the best ingredients and practice your techniques.
Every try gets you closer to your own decorating style. You’ll see your skills grow, making your cakes look like they were made by pros.
Success comes from being open to new ideas and techniques. Try out different colors and designs to see what works best for you. Mirror glaze cakes are great for showing off your creativity, whether it’s through detailed patterns or simple yet elegant designs.
Learning to make perfect mirror glaze is a journey. See each challenge as a chance to get better and try new things. With time and effort, you’ll master cake glazing and wow everyone with your beautiful creations.
FAQ
What is mirror glaze cake?
Where does mirror glaze originate from?
What are the key ingredients for mirror glaze?
What tools and equipment are needed for mirror glaze?
How do you prepare the base cake for mirror glaze?
What is the process for making mirror glaze?
How can you customize the mirror glaze with colors and designs?
How do you troubleshoot common mirror glaze issues?
How do you store and serve mirror glaze cakes?
Source Links
- Mirror Glaze – https://pastryliving.com/mirror-glaze/
- How Mirror Glaze Cakes Took Over The Dessert World – Tasting Table – https://www.tastingtable.com/1564896/history-mirror-glaze-cakes/